
How to use reverb effect to add atmosphere
The Reverb sound effect adds a sense of space and atmosphere to any sound. Learn how to use it properly in this article and add it to your sound directly in the browser using Soundation.
- With Reverb
- Without Reverb
What is reverb?
If you’ve ever been in a church, a tunnel, or any other empty room, you’ve experienced what’s known as reverberation. Let’s say you’re in a tunnel and yell something, the sound will continue to ring out after you’ve stopped yelling. This is also sometimes known as an echo. What really is happening is that the sound waves are bouncing around and reflecting off of all the walls and surfaces to eventually come back to your ear. This happens in all environments, it’s just that it’s more obvious in certain spaces depending on the size, material, and shapes of the reflecting surfaces.
With a reverb effect, we can add this sense of space and atmosphere to any sound. Think of it as creating a virtual room around the sound source. The size of the room it’s in, the density of the materials the walls are made of, and other properties of this room make a dramatic difference to how your ears perceive the sound. Depending on its settings it can sound like a bathroom, closet, church, or any other space. Used moderately, reverb works on almost any sound.
There are many different types of reverb, many of which can be emulated using Soundation’s presets. Spring reverb, hall reverb, plate reverb, and digital reverb are all terms that stem from a time before music was made in the box (in your computer). Originally reverbs were in fact physical spaces or reverb units designed to emulate them.
The first solution was to place a speaker in an actual room and record the sound again with a microphone. Later, more compact solutions included running the audio signal through a spring or a plate. Digital reverbs were effects units in rack form with digital hardware designed for this task specifically.
How to use reverb in Soundation
Quick reverb [Beginner]
- 1Open Soundation and create a project
- 2Double-click the channel to which you want to apply the reverb, this will open up the bottom panel
- 3Press "+ Add effect" and select Reverb in the drop-down menu
- 4In the upper right corner, you can now select one of the pre-made settings
Start using the Reverb effect
Custom reverb [Intermediate]
For the more adventurous music producer: let’s take a look at all the individual parameters of the reverb and how they affect the sound so you can fully customize it to fit your needs.
Being able to add reverb to your sound and knowing how to customize it to fit your song is one of the most essential tools in your sound-shaping toolbox. It will help you place your sounds in the right stereo space and depth, as well as make your songs a more interesting experience.
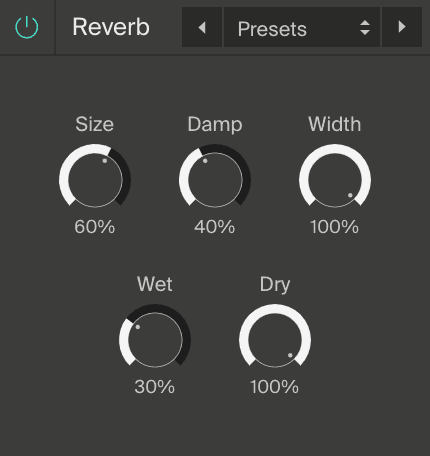
Size
The Size knob changes the room size of the reverb sound effect, the early reflections, and the amount of time it takes to fade out (reverberation time). Simple: bigger size - bigger room. It also controls how long the reverb tail will last, effectively making for a longer decay time. For the sound of a small room keep the size parameter relatively low. If you want it to sound like your sound is in a church, turn this up. Maxing it out will give the illusion of an endless cave.
Damp
The Damp setting affects the tone of the room. It simply dampens the sound of the reverb - more damp means less reflection. Going back to the virtual room analogy it would change the properties of the wall in your virtual room.
Imagine the difference between yelling in a room with tiled walls versus the walls being covered in drapes. The tiled walls would reflect more of the high frequencies and the room with drapes would absorb those frequencies.
Width
Increasing the Width makes the sound of the reverb wider in the stereo field. Keeping the knob all the way down makes it sound like it’s dead-centered in the mix. This doesn’t affect your original (dry) signal, only the wet signal - the actual reverb.
Dry/Wet
The Dry and Wet knobs allow you to control how much of the original, pre-processed signal and how much of the pure reverb effect signal you want to be audible. When we’re using the word signal we’re talking about the sound of the channel we’re working on.
Dry is the unaffected signal and wet is the reverb effect. If it’s more dry than wet, it’s going to sound more upfront, and if it’s more wet than dry, it’s going to sound more distant.
Advanced reverb use [Pro]
Insert vs. Send
What we’ve done up until now is use the reverb as an insert effect. This means placing the effect directly on a channel, which is fine in many cases but is not the most flexible way of controlling the sound of your reverb.
Using the reverb as a send effect means you’re giving the reverb its own dedicated FX channel to which you can later send a portion of the signal from other channels.
This FX channel you’ve created lets you use the same reverb effect for multiple channels, which both keeps your project tidier and frees up processing power.
How?
- 1Click FX Channel under "+ Add Channel", press "+ Add Effect" in the bottom panel and choose the Reverb
- 2On any channel you want to send to the reverb channel, press "+ Add Effect" in the bottom panel and choose Send
- 3In the drop-down menu of the upper right corner, select the FX channel you made in step 1
- 4On your FX Channel, make sure it’s set to 0% Dry and 100% Wet. We don’t need the reverb channel to play the original unprocessed sound back
- 5Send controls how much of the original signal you want to send to the reverb, Pan controls the stereo balance of the reverb and Output controls how much of the original signal you hear
- 6Adjust the send volume of the original track and the overall volume of the FX Channel to get the results you want
Using a separate FX channel also allows you more control over when and how much of the signal from one channel should be processed by the reverb. For example, imagine the word “reverberation” is being played back and you only want the last half of the word to be affected by the reverb.
With an insert effect, the only solution would be to pull the wet knob up halfway through. The first “reverbe-” part of the word would still be ringing out because the reverb is constantly processing the original sound - we’re just changing when we want to hear what it’s doing or not.
With an FX channel, we can instead choose to use automation and hold back on sending the signal from our “reverberation” channel until it reaches the “-eration” part of the word, effectively solving our problem.


